|
|
||
|
|
|
|
|
|
Upgrading Older FirePoint Single-User to Version 12All older FirePoint single-user versions 6.06, 6.56, 7.0.2 & 8.06 (when not used to feed data to an older FirePoint server) can be upgraded to Version 12. Use this upgrade procedure ONLY if your are upgrading from an older version of FirePoint to single-user Version 12. If it's been a long time since you last performed FirePoint Maintenance run 4D Tools Compact to prepare your data file for the upgrade. Remember, you must run the version of 4D Tools that matches the version of FirePoint you are using. See the Upgrades page for version information. If you wish to review the instructions for running tools click on the appropriate link below:
Here's the basic outline for upgrading the single-user version of FirePoint:
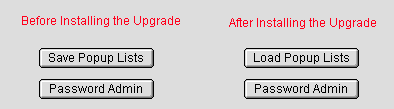
FirePoint V12 will scan your installation for a valid license key. If it finds a key it will ask, "Use stored license to initialize this upgrade?". If you click OK FirePoint V12 will not require a key disk. If you click Cancel FirePoint V12 will allow you to activate new privileges with a new key. 1. Export your passwords & pop-up lists via the Server PathStart your current version of FirePoint. Enter as Administrator. At the Command Window press the "Maint" button. Press the "Upgrading" tab. Follow instructions on the screen to export your Pop-up lists and passwords via the server path. If you get a Server Path error create a new folder called “Transfer”. Inside the folder put an empty “Notepad” text file entitled Index.txt. Press the “Setup” tab and then the “Set Paths” button. Set the server path to the Transfer folder you created. Test the server path then repeat the procedure above. Note: There's a pop-up list called "ModList" which is a list of lists. Any valid list title placed in ModList will cause the list with that title to be exported during upgrades. Since ModList also exports you can always get your "custom" lists to export by adding their title to ModList (see Pop-up Lists tab). Remember: The "Save Groups" and "Load Groups" options for the "Password Admin" button are located in the "Passwords" menu bar in the extreme upper left corner of the FirePoint "Upgrade" page.
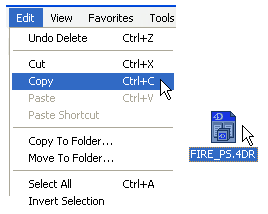
After your passwords and pop-up lists have been exported successfully quit FirePoint. 2. Rename your original FirePoint folder Locate your FirePoint application folder. By default it's located on the C: drive in the "Program Files" folder. This is an important step. Retitle the FirePoint folder adding the letters "OLD" in front of the folder's title. So if the original folder title is "Fire_PSV65" the new title will be "OLDFire_PSV65"; if the original folder title is "FirePoint2003" the new title will be "OLDFirePoint2003". You must rename the folder to make certain you do not overwrite your original software with the upgrade software you will be installing. 3. Download the upgrade installerMake sure you have your support password. Click on the download link below. Enter "firepoint" as your username and your support password when requested. Download the single-user installer inside the folder by double-clicking on the file and pressing the "Save" button. Click the download window's Close Box (X) when you are ready to return to these instructions. 4. Run the upgrade installerOnce you have downloaded the Installer executable double-click on it. By default the installer will place a new "FirePointV12" folder in C:\Program Files\. Make sure you know where you are saving the folder if you decide to select another location. Test your new installation. Confirm the newly installed demo works OK. Quit the demo. Remove the two demo data files from the "Database" subfolder inside the FirePointV12 application folder. The two data files are titled: FirePoint_v12.4DD & FirePoint_V12.4DR We will replace these demo data files with your own data files in the next step. 5. Copy existing data files into the new FirePoint V12 "Database" folderAt this point you need to locate your "OLD" FirePoint folder. We want to make copies of your current data files. The data files are the Fire_PS.4dd and Fire_PS.4dr files. The copies of these data files will be placed in the new FirePointV12 folder - "Database" sub-folder which was created by the upgrade installer.
Now rename the pasted data files as follows: FirePoint_v12.4DD & FirePoint_V12.4DR Once the new files have been installed restart FirePointV12. You may find a new FirePoint shortcut icon on your desktop. Make sure you delete any old shortcut's which you may have been using. Enter FirePoint as the Administrator. 6. Import passwords & pop-up lists via the Server PathAt the Command Window press the "Maint" button. Press the "Upgrading" tab. Follow instructions on the screen to import your Pop-up lists and passwords via the Server Path.
At the Command Window press the "Maint" button. Press the "Password Admin" button. Update and reset passwords as needed. Remember, if you wish to reset passwords for Senior Staff, Secretaries, Captains, etc. you can do so by using the "Pause" button on the Command Window to check-in as those users. Remember, there's no password after the upgrade. Press the Incidents button and under the File menu in the Incidents list view select "Change Password...". 8. Run the upgrade procedure At the Command Window press the Maint button. Press the "Maintenance Tab". Press the "User Maintenance" button. Follow instructions to enter the following user maintenance password: UpgradeTo10 Allow time for the upgrade procedure to run. After the procedure is done press the Cancel button. Return to the Command Window. Final Considerations FirePoint V12 makes future V12 upgrades easy. A simple file swap will be all you need to upgrade your Version 12 installation in the future .If you didn't run 4D Tools Compact immediately before the upgrade, it's a good idea to do it now. Another advantage of FirePoint Version 12 is that 4D Tools is now built-in and automated. Simply press the Maint button and click on the Maintenance tab. Click on the "Security Center" button. Your 4D Tools options will appear as icons on the left side of the page. 4D Tools handles file swapping eliminating the need to change file names as part of running 4D Tools. If you have any major problems return to using the "OLD" folder backup of FirePoint. Click the link below or call for support assistance. (727) 823-0880
|
| Copyright (C) 2012, End2End, Inc. All rights reserved. |