|
|
||
|
|
|
|
|
|
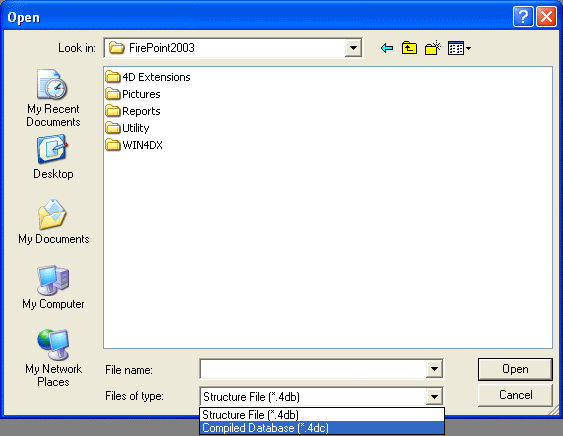
Here's how to run 4D Tools 2003 (7.0.8)Overview There are two reasons to run 4D Tools, database maintenance and database repair. If you run 4D Tools for regular database maintenance you will need to run it less often for database repair. All databases require regular maintenance. Databases are like hard disk drives. They need to be "defragmented" from time to time. FirePoint uses a procedure called "compacting" to defragment it's data file. You should compact FirePoint data at least once every three months. Some busy fire departments make compacting a monthly routine. 4D Tools can also be used to repair your database. If you get unpredictable results when searching, error messages or slow operation you may need to repair your data file with 4D Tools. With FirePoint two repair methods are used, "Check and Fix" and "Recover by Tags". Both methods will fix damaged records, but the more complete job will be done by "Recover by Tags" which creates a totally new data file. Both maintenance and repair procedures start the same way. Begin by organizing your FirePoint application folder Open your FirePoint application folder (usually found on the C: drive in the "Program Files" folder). Clean house a bit by locating any extra or old data files (".4dd") which may not have been removed from the application folder. If you have data files titled Fire_PS2.4dd, Fire_PS3.4dd or Fire_PS_2.4dd in addition to your Fire_PS.4dd data file make sure you identify the most recently updated data file. Name the most recently updated data file Fire_PS.4dd and remove the others from the FirePoint application folder. Restart FirePoint and check your data for completeness before proceeding with 4D Tools. Starting 4D Tools Begin by quitting FirePoint. FirePoint should not be running when you are running 4D Tools. If you are using the single-user version of FirePoint press the Quit button. If you are using the server version of FirePoint make sure all clients have logged-off and quit the FirePoint server application. In the FirePoint application folder you will find a "Utility" folder. Open the "Utility" folder then open the "Tools" folder inside. Double-click on the 4D Tools executable (.exe) to start 4D Tools. The 4D Tools executable icon resembles a wrench and other tools. Opening your database When 4D Tools starts you will see a standard Windows file navigation dialog box.
Navigate to the location of your FirePoint application. You may need to select the C: drive from the drop-down arrow in the "Look in:" field at the top of the Open dialog. Navigate to the FirePoint application folder and open it. At the bottom of the Open dialog select the options in the "Files of type:" field. Select "Compiled database". This will allow you to see the Fire_PS.4dc compiled database files. If you are running 4D Tools on the single-user version of FirePoint locate and double-click on the Fire_PS.4dc file. If you are running the server version first open the "Fire_PSs" folder then double-click on the Fire_PS.4dc file. Enter 4D Tools using the Administrator password. When Version 2003 of 4D Tools appears examine the 4D Tools window for information about FirePoint. You will notice at the bottom of the Information tab page you will find information about whether or not you need to run 4D Tools Compact. Run Compact if told to do so or it's been a long time since you've done it. We'll illustrate the "Compact" maintenance procedure first. Running 4D Tools for Maintenance Compacting is a maintenance procedure so begin by pressing the "Maintenance" tab. Press the "Compact" button to begin compacting the data file.
Compacting rebuilds the data file creating a new "compacted" data file. Since this procedure produces a new data file without deleting the old data file, you must be sure you have enough room on your hard disk to save a new data file. If you are in doubt stop now and confirm you have enough room to save a copy of your data file before proceeding.
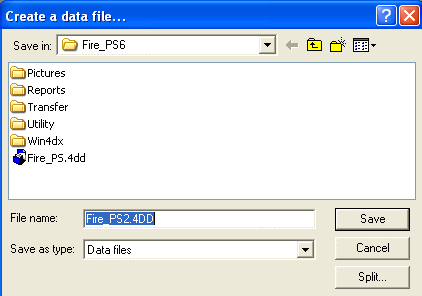
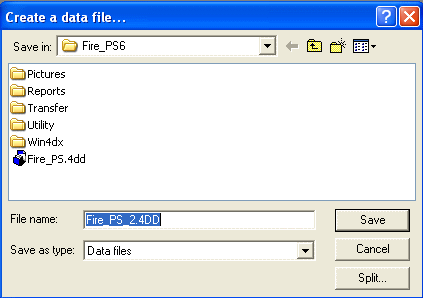
Note: Do not allow 4D Tools to replace any existing data file. If your FirePoint application folder contains multiple data files make sure you organize your folder by removing older data files before proceeding. Notice 4D Tools is creating a new data file (".4dd") with an extra "2" appended to the title. Press the Save button. Give Tools time to work. After 4D Tools completes it's operation, select "Quit" from the File menu. Go to the FirePoint application folder and remove the original Fire_PS.4dd folder from the FirePoint application folder. Next remove the extra "2" from the new Fire_PS2.4dd data created by the compacting process. With the old data file removed from the FirePoint application folder and the new data file renamed just like the old data file you should restart FirePoint. Make sure all of your data is present. If your data is in order locate the old (original) data file you removed from the FirePoint application folder. Place this old file in the recycling bin. Running 4D Tools to Repair At the main 4D Tools window press the Repair tab. If you have encountered an error message about a bad record press the "Repair Records" button. Press "Select All" to select all records for repair. Optionally, you can select to repair records only in the table where the error occurred. This repair procedure does not create a new data file. Also under the Repair tab is the "Repair Indexes" button. This button is used to correct problems with searching and other indexing errors. "Repair Indexes" will rebuild all indexes in selected tables. To rebuild the indexes in all tables simply press the "Select All" buttons after pressing the "Repair Indexes" button. This repair procedure does not create a new data file. Select "Check and fix damaged record or indexes". If these buttons resolve your data error messages you might want return to 4D Tools to run the 4D Tools Compact procedure above for maintenance purposes. If these buttons do not resolve your data error messages you should quit FirePoint and return to 4D Tools to follow the procedure below to Recover by Tags. Sometimes the repair buttons will find severe damage. 4D Tools will inform you. It will recommend you run 4D Tools Recover by Tags. Like 4D Tools Compact, 4D Tools Recover by Tags will create a new data file. The new data file created by Recover by Tags will add an "_2" to the data file title (Fire_PS_2.4dd). Recover by Tags Press the Repair tab. Press the "Recover" button.
4D Tools Recover by Tags will present a dialog notifying you a new data file is being created.
Note: Do not allow 4D Tools to replace any existing data file. If your FirePoint application folder contains multiple data files make sure you organize your folder by removing older data files before proceeding. Notice 4D Tools is creating a new data file (".4dd") with an extra "_2" appended to the title. Press the Save button. Give 4D Tools time to work. After 4D Tools completes the Recover by Tags operation, select "Quit" from the File menu. Go to the FirePoint application folder and remove the original Fire_PS.4dd folder from the FirePoint application folder. Next remove the extra "_2" from the new Fire_PS_2.4dd data created by the Recover by Tags process. With the old data file removed from the FirePoint application folder and the new data file renamed just like the old data file you should restart FirePoint. Make sure all of your data is present. If your data is in order locate the old (original) data file you removed from the FirePoint application folder. Place this old file in the recycling bin. If you attempt a Recover by Tags procedure and it fails to recover the data in your data file make sure you have enough room on your hard disk. If inadequate hard disk space is not the problem retry 4D Tools Recover by Tags. Stubborn problems may require several attempts. If problems persist email support at the address below. Do not throw away any old data files until FirePoint has been repaired. Right-click on the link below to download this page as a word processing document called a "Tech Sheet". Tech Sheets may be edited, printed and stored with your documentation for easy reference.
|
|
| Copyright (C) 2012, End2End, Inc. All rights reserved. |